How to Make Freezer Bag Guacamole

Use your freezer to turn basic ingredients into a Delicious, Spicy Mexican Treat!
Everyone who knows me, or has read my recipes, knows that I love using fresh ingredients when I cook. I also LOVE convenience cooking! This recipe for Homemade Freezer Guacamole is easy as pie to make and is less messy than most conventional recipes. AND, although you can immediately eat it, freezing your Guacamole before serving allows the ingredients time to meld together to create a complex Mexican Dip.
Make up several batches at a time when avocados are on sale, and you'll always have a classy, tasty dip on hand when unexpected guests arrive, or you need a yummy snack during football season.

Getting Starting
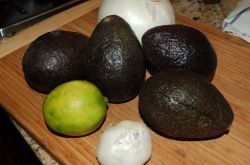
Select Ripe and Fresh Ingredients
I usually make several batches at a time when avocadoes are on sale. This recipe makes two batches:
4 Ripe Avocado
1 Small Onion (I usually use White or Red)
1-2 garlic cloves
1-2 jalepeno peppers
1 Large Lime
Kosher Salt
2 Ziploc Quart Size Double Zipper Freezer Bags
Knife
Cutting Board
Spoon
Zester (optional)
Food Chopper (or food processor or your trusty knife)
Juicer
Stock Bag

Cutting and Pitting Your Avocado
It's not hard - Really!
The hardest part of this recipe is cutting, pitting and scooping out your avocadoes. But really, it's NOT hard at all - just a bit messy.
Hold your avocado in your hand and holding your chef's knife horizontally across the avocado, gently press to make a small incision. Slide your knife horizontally into the incision and, holding knife in place, use your other hand to slowly roll the avocado either towards or away from you until you've gone full circle. Your avocado will then be cut in half.
Put your knife down, and using both hands, gently grasp your acado and twist your hands - the left in one direction and the right in the other. At the same time, gently pull the pieces apart. You'll end up with the pit in one of the avocado halves.
Using your chef's knife, and being VERY careful, aim for the middle of the pit with the middle of your knife and whack. Your knife will end up "imbedded" in the pit. DON'T hit the pit too hard or you'll split it. Once the knife is imbedded, gently twist and pull the pit out. Discard the pit.
Now, using a large spoon, scoop the avocado flesh out and place it into a freezer bag. You should end up with two avocados per bag. Be sure to scrape all the flesh from the shell, being careful NOT to get the hard stem core that sometimes comes loose from the end of the Avocado.


Get your Freezer Bag Ready
Adding your ingredients
Now, using a large spoon, scoop the avocado flesh out and place it into a freezer bag. You should end up with two avocados per bag. Be sure to scrape all the flesh from the shell, being careful NOT to get the hard stem core that sometimes comes loose from the end of the Avocado.
Now, for the chopping part of the recipe: I use my handy-dandy pampered chef food chopper, but your can pull out your food processor or do it the old-fashioned way, and chop/dice next ingredients by hand. Whichever method you use, be sure that your pieces are small. Because I use my chopper instead of pulling out the food processor, I have very little clean up! Now that's easy.
Chop the onion after removing papery skin and ends. If you read my recipes, then you know that you need to add these scraps to your freezer scrap bag so that you can use them when making your homemade stock. Check out my recipe for making homemade stock.
If you've never had garlic in your Guacamole, you might want to start with just one clove (1/2 for each bag). Chop your garlic after removing papery skin. The easiest way is to take your clove and smash it with the side of your chef's knife. The paper will come off easily. I add this to my stock bag too since my family uses garlic in everything.
Chop your jalapeno pepper(s) (or you can use any other type of hot pepper that you love). The number of peppers used depends on how spicy you want your Guacamole to be. I usually leave the seeds in and use just 1/2 to 1 pepper per bag.
Divide each of your chopped vegetables in half and place one half in each of the freezer bags. Add 1/2 of a juicy lime (about 1/2 tablespoon) and a good pinch of Kosher Salt to each bag.

Now comes the FUN part!
Squish your Avocado Mixture to Make Guacamole
This is a great thing for the kids to do, just make sure that the freezer bag is CLOSED. I find that using a paper towel to wipe the seam of the bag helps ensure a firm seal. Also, get out as much air as you can so that you don't accidentally "blow open" your bag when you squish your ingredients.
Although I usually don't recommend certain brands, I strongly encourage you to splurge and get the heavy duty, double sealed Ziploc Freezer bags. You are going to squish your bags to blend the ingredients and if you don't have a good seal, you'll end up with a huge mess. Believe me, I had a mess on several occasions before discovering these sturdy bags.
Anyway, gently squish-squash your avocadoes and other ingredients. We tend to like chunky Guacamole, so I find this method works best for us. You are in charge of the consistency of your finished product so stop squishing whenever you reach your preferred consistency.
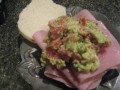
You can go ahead and use your Guacamole now (look at tips for adding other tomatoes). But, I've found (and my family agrees) that freezing the Guacamole, even for a couple of hours, helps the flavors meld. {note that the red in my picture is from a red onion, not tomato].
Lay your bags flat, and get out the last bit of air and make sure you have a firm seal. Label and date your bags. Lay them flat in your freezer until frozen and then you can stand them up to save freezer space.
To thaw, just pull them out and place the bag in the refrigerator, or a bowl of hot (not boiling) water. You can also cut the Guacamole out of the freezer bag and place it in a microwave safe dish and defrost (don't cook!) it in the microwave oven. To remove from bag, cut one of the bottom corners off and squeeze your delicious Guacamole into a bowl. It's like frosting a cake using a pastry bag. Once it's drained, you just throw your freezer bag away and your done!
You'll be the most popular person on the block (and the hit of your household) with this Tasty, Spicy Guacamole. ENJOY!

Pop your Guacamole into the Freezer
Freezing helps to meld flavors making this a Tasty, Spicy Mexican Treat
You can go ahead and use your Guacamole now (look at tips for adding other tomatoes). But, I've found (and my family agrees) that freezing the Guacamole, even for a couple of hours, helps the flavors meld. {note that the red in my picture is from a red onion, not tomato].
Lay your bags flat, and get out the last bit of air and make sure you have a firm seal. Label and date your bags. Lay them flat in your freezer until frozen and then you can stand them up to save freezer space.
To thaw, just pull them out and place the bag in the refrigerator, or a bowl of hot (not boiling) water. You can also cut the Guacamole out of the freezer bag and place it in a microwave safe dish and defrost (don't cook!) it in the microwave oven. To remove from bag, cut one of the bottom corners off and squeeze your delicious Guacamole into a bowl. It's like frosting a cake using a pastry bag. Once it's drained, you just throw your freezer bag away and your done!
You'll be the most popular person on the block (and the hit of your household) with this Tasty, Spicy Guacamole. ENJOY!
Tips
Adding Tomatoes and Cilantro
* I prefer to add my chopped tomatoes to the Guacamole before I serve it.
* Use your own fire-roasted tomatoes and make this extra special (my recipe is coming soon)
* Adding Cilantro makes this even tastier, although I usually don't add it when I am making Guacamole just for my family's use. We are not cilantro fans.
* I know this recipe is a bit different from conventional recipes because I add garlic. We add garlic to almost everything in our house and
believe me it tastes great in Guacamole too!
What you'll Need to Make Freezer Guacamole
Although I usually don't care about "Name-Brand" products, I will say that it is imperative that you use a quality, solid freezer bag that REALLY gives you a good seal to make this recipe!